If your website loads very fast for you doesn't mean this is so in every part of the world. Your hosting company may limit bandwidth to other countries and your visitors may experience trouble exploring your site. The simplest way to check your site's loading speed is to open it in every country but of course it is impossible. Other way is to ask your IM friends to check how the site loads for them but it is also not very convenient. Luckily there are free service which does it for you.
WatchMouse can check any site loading time from 10 places scattered all over the world. You only have to type in your web page and hit enter. After several seconds you will get a results list which show average Resolve, Connect and Download time of your site.
This is quite accurate measurement because countries includes Melbourne (Australia), Asia (Shanghai), Europe, South and North America.
The WatchMouse site also offers you to watch your host 24/7 for additional fee or install small program and ping your site continuously.
Bellow is the results page for my blog Tips4Weblife. Seems that no problem was detected and everybody could view it without problems.
If you need to find where is the middle line in picture you can quickly do it by trying to select the picture. Left click on white space near the image and start pushing mouse to the other end of the picture, when you approach middle vertical line the picture becomes highlighted. Swing the mouse left-right-left and you can imagine where is the middle of the pic.
Keep in mind that picture itself must be displayed in a browser not in image viewer for example.
Here is a simple tutorial on how to make text (logo) with mirror effect in Adobe Fireworks. This type of text and photos became very trendy.
At first open Adobe Fireworks and create a blank project with your prefered canvas size.
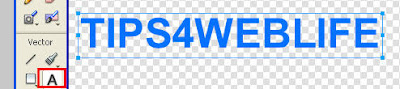
Then select Text tool and type in your text. Choose size and color before you start creating mirror effect because it would be easier to match real text and mirrored part.
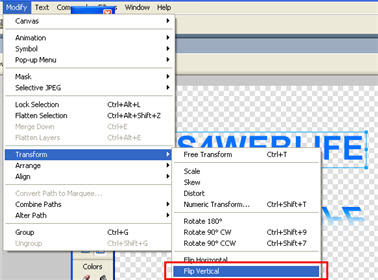
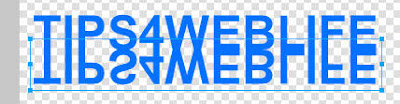
After your text is typed on the stage dublicate it and flip vertical. To do so select text with Pointer arrow and press Ctrl+Alt+D then go to Modify -> Transform -> Flip Vertical
Align flipped version of text with normal text so that they are one above the other.
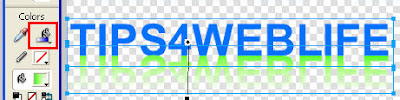
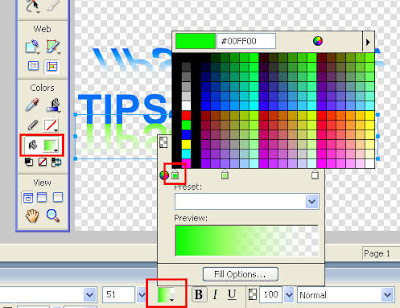
Select flipped text and grab gradient tool or press G for shortcut. Drag with gradient tool selected top down on the text. You will see some gradient with default colors. Now you must change the gradient's color and opacity
Press the color window with bucket icon to show color pallete. Notice gradient line with some arrow selectors on the top, here you can change color and opacity. The most simple gradient is with solid color and opacity 100% on one side and white color and opacity 0% on the other.
Click on the bottom left selector and select color that match your original text. Click on middle bottom selector to adjust color if needed. Now click on those top selectors and adjust opacity.
Skew the mirrored text to add some realistic drop shadow feel. The final result should be something like this.
Of course you can make this effect much better, just play around with textures, colors and opacity levels.
Everybody is concerned about not letting their email be added to spammers database. It is advised not to leave your main email address in the comments or forums because there it can be easily detected by spam spiders. You can use your less important secondary email or just use disposable email.
Other ways for protecting emails are distorting - adding additonal chunk of text which has to be removed. For example:johnREMOVETHIS@maill.com Programs can't recognize the meaning but people surely will understand.
Another way is to use special character for the @ sign. Just replace @ with @ Then your email will look to spiders like: john@maill.com but humans will see john@maill.com
All these and other techniques can't quarantee you 100% because even spiders get smarter. They can be programmed to search words like REMOVEME and actually remove them or replace code @ with @. I thought out another way to hide your email from spiders, its by using flash. Even google can't index flash content so does spiders. If you put your email into flash clip only humans could read it. So what you need is to make a simple flash clip with dynamic text. Users could highlight and copy it to their email programs while spiders will go by and don't notice there is a mail address.
If you are unfamiliar with Flash CS3 don't worry below is very simple tutorial how to make such a clip with your email address inside it.
At first you have to download Flash CS3. You can use trial for 30 days and don't pay any money.
Open Flash CS3 and select Create new flash file (ActionScript 2 or ActionScript 3)
Change canvas size to about 150px width and 50px height (or any size which suits your site)
Click on text tool and write down your email address
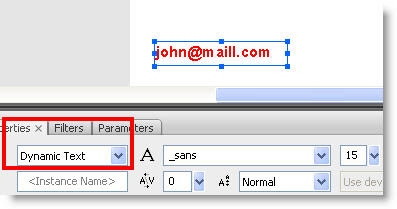
Change type of text to dynamic. This will give people the ability to select and copy text from flash file.
Now create a flash file which has your email address inside. At first test how your clip will look like by hitting Ctrl+Enter. Test if you can select and copy text from the flash clip and make any corrections (add color, change size or font). Save your flash file as myemail.fla on the desktop and hit Ctrl+Enter again, this will render your flash clip and save it in the desktop too. Note that .sfw files are saved in the same location as .fla files are, unless you change output location in the Publishing Settings.
Now when you have this flash file with your email safely hidden you can add it wherever you like in your blog or site. Of course you won't be able to put it in comments or forums in other sites but it will perfectly work as your primary email guard in a blog.
Add flash file to blogger
To add flash file to your blogger blog you need to upload the file first to googlepages (or other hosting source). Copy the address of uploaded flash file and paste it after src=" in the folowing code:
Adjust height and width to your needs and paste this code block into html area in your post. The example is shown bellow. A flash clip is embedded into blogger (you can select and copy to clipboard).
Sometimes you may need to show html, php or other language code in your post but when you write or paste it what happens is it dissappears and even worse damage your whole article. This is because blogger automatically recognizes code and use it as html source even if you insert it in compose mode. The example bellow shows what happens when you insert image tag. Blogger automatically converts it to html and show empty image, but what you wanted is only display this code as an example for your readers.
<img src="/image.gif" width="100" height="75" />
Now let's see how to easily insert a block of code into blogger post. The trouble begins when blogger reads less than sign (<) in a post, it signals that a code is being started and if blogger sees whole <div> tag it auto converts it. What you have to do is to convert special symbols to html entities. For example when you want to show less than sign (<) type < , for greater than symbol (>) type > and so on. Off course doing this by hand is very inneficient way. You can convert code text into html text by simply pasting it to Dreamweaver and copying code from code window.
1. Write code in Dreamweaver's design window and select it
2. Copy selected code from code window. This code is ready to paste into your blogger post. All symbols will be displayed correctly.
When you edit your images Adobe Photoshop (and other programs) adds a line in picture properties revealing that it was modified, for example Creation Software Adobe Photoshop CS3 Windows is added in image properties. The same goes with digital cameras, they also add lots of metadata in image properties (like Camera model, Shutter speed, Date picture taken and so on). More experienced users can quickly right click on the image and say that it was altered with some software. You can't remove this metadata info on the image with plain windows but there are few tricks that might help.
1. Remove picture metadata with Paint.
This tip is faster and suitable for small images, those which fit on the screen. Open image whose metadata you want to delete and just make a screenshot of it. Then open paint and paste it. Save and see that all metadata is gone. Don't be afraid of loosing image's quality because in theory screenshot making is lossless operation
Read my previous post about "How to Make Screenshots"
2. Delete image metadata with JHEAD.
Previous tip isn't very practical when you need to remove metadata from many pictures. And here JHEAD comes into play. This program doesn't have graphic user interface but I'll show you how to use it.
a) At first create folder named pictures in your C disk
b) Then copy all photos whose metadata you want to remove to this folder (C:\pictures)
c) Download a small program JHEAD and save it to that folder
d) Press Start -> Run or Windows key + R to open Run menu, type cmd.exe and press OK
e) A cmd command line window open. Now be careful and type exactly what is written:
type cd\ and press Enter
type cd images and press Enter
type jhead -purejpg * and press Enter
now you should see a list of images whose metadata was removed. Your cmd window will look similar to this
Check your images' properties and see that all metadata is removed. Now you will be sure that noone will see any additional information except image itself.
Recently all subscribers to CartoonSmart.com got a newsletter with 20% off discount of all tutorials old and new from this site. This offer will last only until December 25.
The code itself is 02857416, you have to enter it in paypal's check out window.
Justin (owner of CartoonSmart) is a flash guru and makes great tutorials which are both easy to follow and understand. There are plenty of tutorials for absolute beginners and advanced users. Flash is very nice and handy program which can help you to make banners, animation, web pages, page elements and so on. Being vector based flash files are very small in size (if correctly optimized) and save a lot of bandwidth.
If you want to check it out, you can download some free tutorials from CartoonSmart.
I should also mention that Justin has a good sense of humor and in every tutorial you will find moments where you will laugh along with him.
Interesting thing: If you notice CartoonSmart site is made only from a few flash files but still has a very high Page Rank of 6. This is hard to achieve for flash based web sites because Google is unable to index flash files so it is advisable not to create entire web sites in flash or at least try to keep text parts as html.